Slayer UK Brand Ambassador and Sales Promoter | 2X World Coffee in Good Spirits Champion
I have been fortunate enough to make coffee on a Slayer Espresso for over a year, and it has completely revolutionised the way I approach espresso. It has been such an eye-opening experience, challenging my expectations of what espresso is capable of and giving me the control to make the best espressos I have ever brewed. With so many different ways of manipulating the shots, here is my dial in flow chart that I use as a starting point when dialing in new coffees.
Preparing to dial in
Ensure you have a minimum of 1kg coffee for dial in
Ensure you have plenty of high quality water and waste space if machine not plumbed
Follow installation steps in manual / on website, set pump to 9-bar
Clean machine thoroughly and frequently for optimal results
Set brew temperature to 93C/199.4F
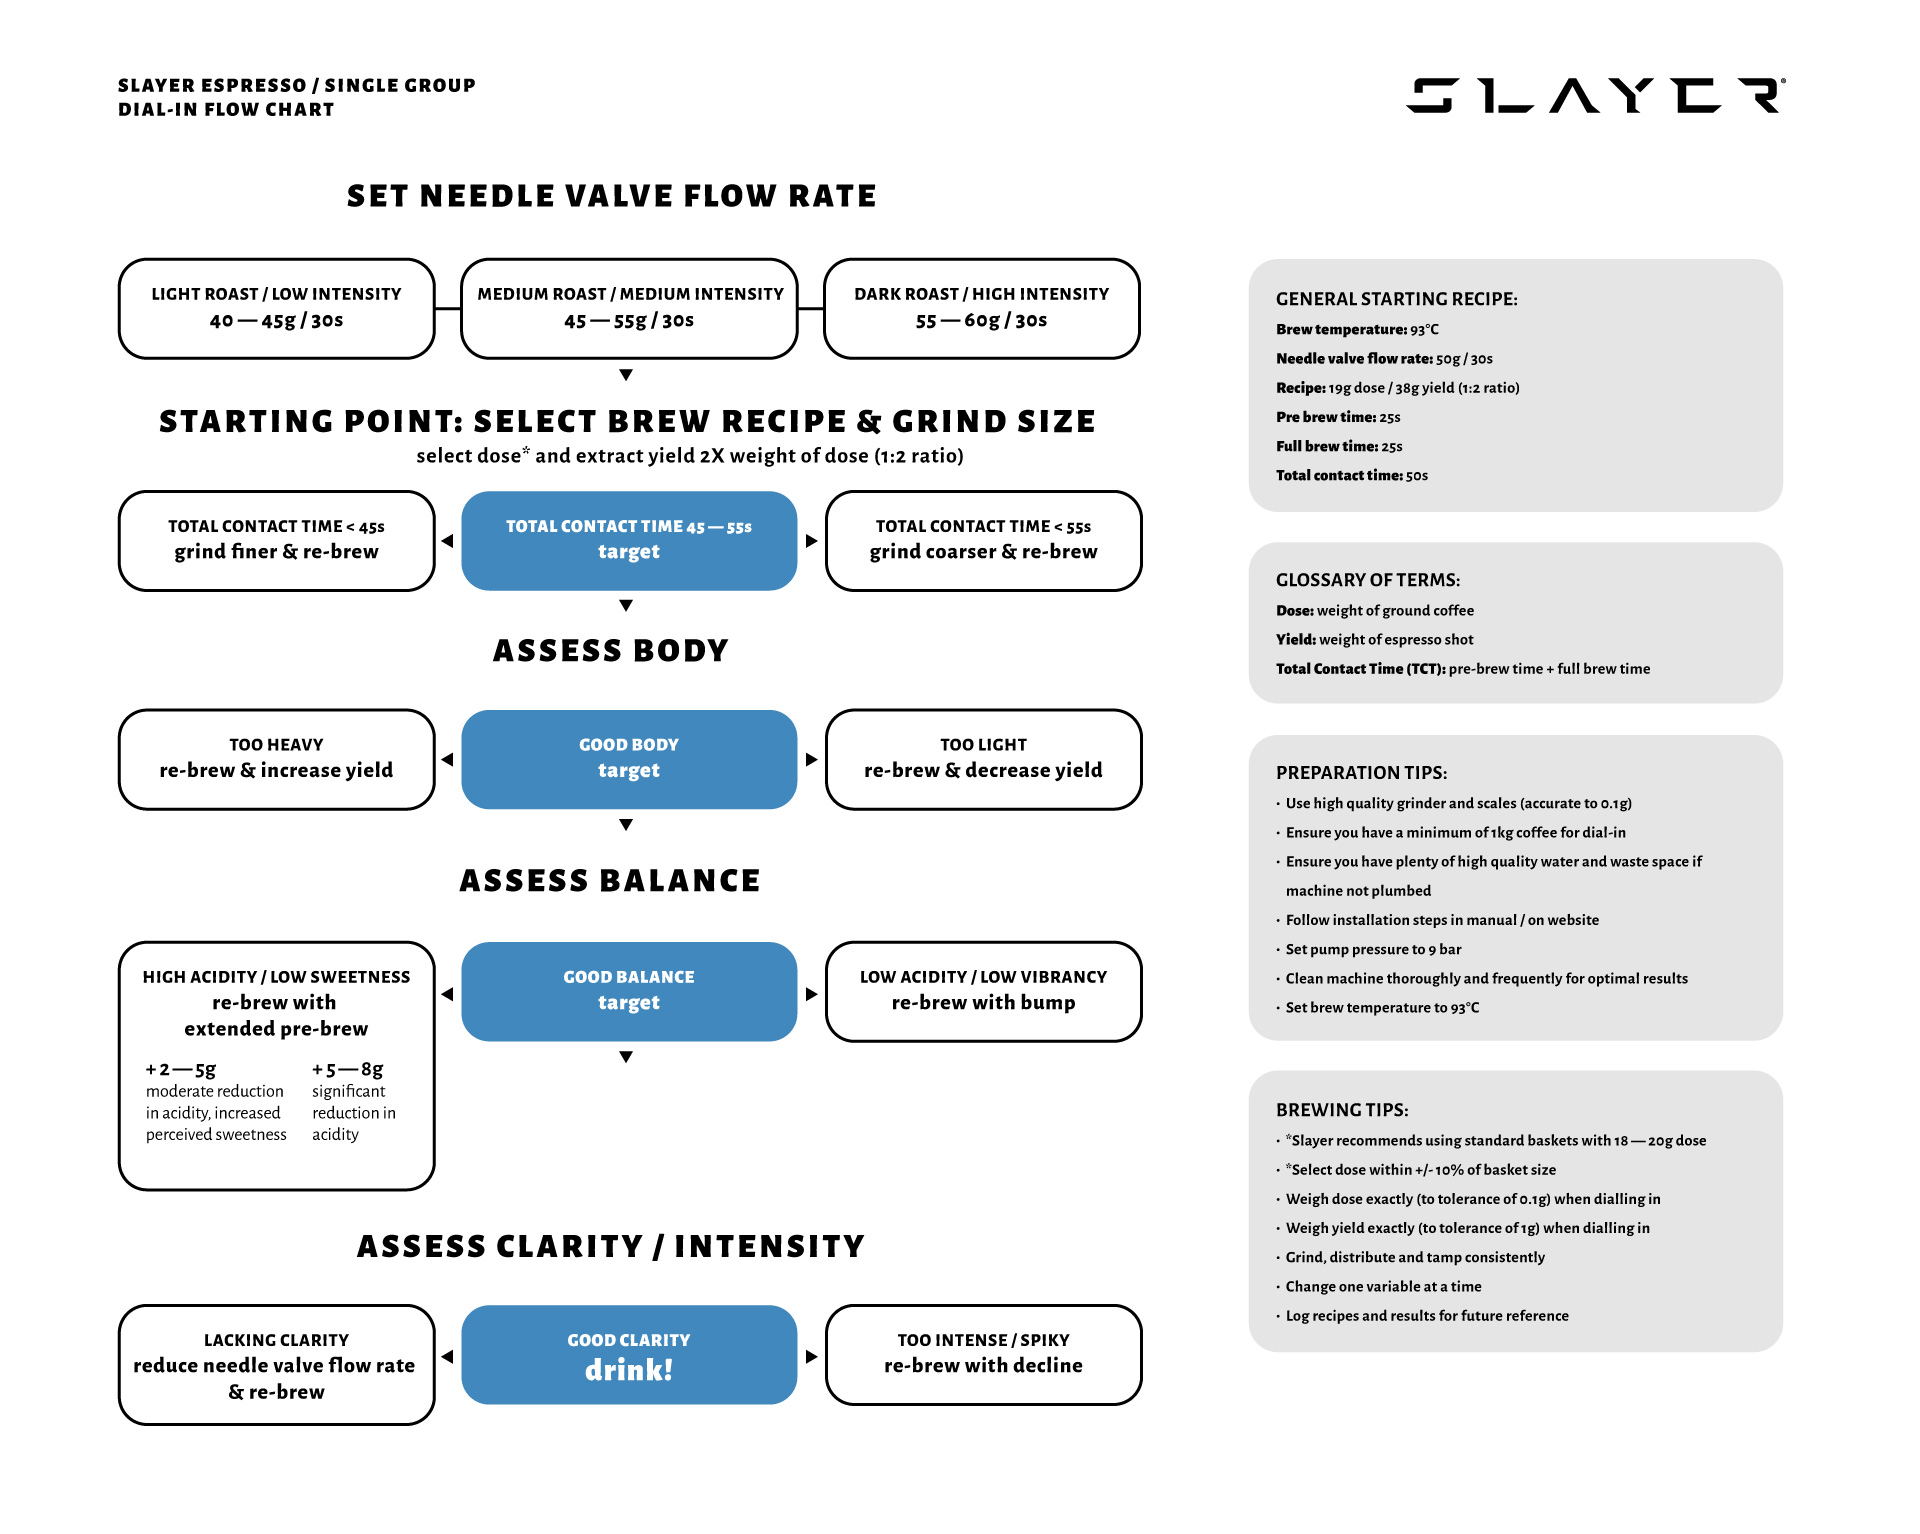
Step 1: Set flow rate using needle valve
Use needle valve to set pre-brew flow rate to between 40-60g water per 30 seconds. Specific settings can be based on the roast profile and intensity of the coffee being dialed in.
Light roast / low intensity coffees: 40-45g per 30 seconds
Medium roast / medium intensity coffees: 45-55g per 30 seconds
Dark roast / high intensity coffees: 55-60g per 30 seconds
Process
Purge in full brew (left) position for ten seconds
Move actuator into pre-brew (middle) position and measure how much water is delivered in 30 seconds
Adjust flow rate using needle valve – clockwise will decrease flow rate, anti-clockwise will increase flow rate (note: make small changes)
Repeat until desired flow rate (-/+5g) is achieved
Step 2: Select dose and yield
Slayer recommends a dose of 18-20g. I tend to use a fixed 19g dose and adjust my brew ratio later on, if required, by adjusting the yield of the shot.
Step 3: Adjust grind size to achieve target total contact time (45-55s)
Total contact time (TCT) is made up of pre-brew time + full brew time. As a starting point, aim to achieve a TCT of between 45 and 55 seconds. Within this window, many coffees will be close to achieving balance and the body will broadly represent that of the final, dialed in shot. When brewing a ‘Slayer shot’, allow the shot to fully saturate in the pre-brew position before moving into full brew as soon as the puck is fully saturated.
If your total contact time is less than 45 seconds, grind finer, purge and re-brew from starting point
If your total contact time is more than 55 seconds, grinder coarser, purge and re-brew from starting point
Step 4: Assess body and adjust yield
Once your TCT is between 45 and 55 seconds, taste the shot and assess the body of the shot.
If the shot is too heavy, re-brew the shot and increase the yield to decrease the body of the shot (it should be more juicy and light)
If the shot is too light, re-brew the shot and decrease the yield to increase the body of the shot (it should be more syrupy and heavy)
Step 5: Assess balance and adjust grind / total contact time
Once you are happy with the body of your shot, re-brew from the starting point. If you have adjusted your yield, you may need to slightly adjust your grind size to be within the 45-55s TCT window. Once you are back within this window, taste your shot and assess the balance of the shot.
If the shot is too acidic, grind finer and re-brew (this will increase your total contact time)
If the shot is too bitter, grind coarser and re-brew (this will decrease your total contact time)
Step 6a: Fine tune your taste balance with ‘extended pre-brew’
If you would like to reduce the acidity of your shot and increase perceived sweetness, a technique called ‘extended pre-brew / extended saturation’ can be used. By extracting a small amount of the shot in the pre-brew position (2-5g) before moving to full brew, acidity will be moderately reduced and perceived sweetness is likely to increase. If more of the shot is extracted in the pre-brew position (more than 5g), there will be a further reduction is acidity.
OR…
Step 6b: Fine tune your taste balance with ‘bump’
If you wish to increase the acidity and vibrancy of your shot, a technique called ‘bump’ can be utilised. Bump is a technique where the brew actuator is moved all the way into the full brew position before immediately backing off into the pre-brew position before extracting as you otherwise would for a ‘Slayer shot’.
Step 7: Assess clarity and intensity and fine tune
Once you are happy with the taste balance of your espresso, assess the clarity and intensity.
If the shot would benefit from greater clarity, it is possible to slightly reduce the flow rate by adjusting the needle valve clockwise (this should slightly increase the pre-brew time while also improving the clarity of the shot)
If the shot is too intense or spiky, it is possible to use a technique called ‘decline’ to reduce the intensity and make the shot softer and rounder. Decline can be achieved by extracting the espresso as you would for a Slayer shot, but by extracting the final part of the shot in the pre-brew (middle) position.